The upper level of my two-level layout is all narrow gauge, depicting a portion of the former Denver & Rio Grande Western’s Fourth Division line in southwestern Colorado and northern New Mexico.
Canyon Scene - Lower Level
This freelanced scene incorporates a flowing river, like the Arkansas cutting through the Royal Gorge in Colorado. At the lower end, the standard gauge emerges from a tunnel and immediately crosses the river over a deck girder bridge, then through a rock cut, along a curved cut stone retaining wall, over a double span deck bridge, along a curved fill, through a Howe truss bridge, and into the yard at Alamosa. Along the way a third rail is added for narrow gauge operations at Alamosa.
This canyon scene had languished, incomplete, for years. It was roughed in, with a few early attempts at casting plaster rocks in place, then my efforts moved to the narrow gauge on the upper level. Unhappy with the initial rock castings, I tore them out and replaced them over more years using better molds, technique, and experience. As the 2025 National Narrow Gauge Convention approached, this scene finally made it to the top of the priority list. These images document the progress over time.
 The canyon scene at the beginning, in 1990. The hard shell scenery base is corrugated cardboard, cut into strips, and covered with paper towels soaked in Hydrocal plaster. A few rock castings had been added at this time, but were later replaced with better ones. |  By 2025, the better rock castings were mostly in place, but not yet colored, and there were still gaps in the scenery base where several bridges were to be placed. Separately, the girder and truss bridges were built, the cut stone retaining wall supporting the track was cast in place, and abutments for the bridges were cast. |  The tunnel portal was a plaster casting, simulating a board-by-board concrete form. The rocks were already in place. The portal was weathered with a spray of grimy black and with chalks. |  The tunnel portal and the location for the girder bridge in early 2025. The rock castings are partially colored using a wash of grey, with splotches of red and blue washes, as per Dave Frary’s How to Build Realistic Model Railroad Scenery. |  The double span girder bridge and the bridge abutment castings are being fitted into the partially completed scenery shell. |  Once the bridge fitting is complete, the scenery shell is completed, including the gaps in the river bed. The bridge and wing abutments are plaster castings made from molds of Walthers products, with modifications for fit. They were colored and weathered before installation. |
|---|---|---|---|---|---|
 The bridge installation, with dual gauge track, is temporarily back in place. |  The first layer of scenery has been added using fine and coarse ground foam products from Woodland Scenics. The river bed was poured using a thin plaster mix, to maximize a smooth surface. The bridges have been removed again to avoid damage during scenicking. |  An overhead shot of the riverbed painting process, working upstream. Using the principles of geology, the deep water (darker blue) is on the outside of each river bend, and the shallow water (light blue) and tan (damp shoreline) is on the inside. The shades chosen initially were too dark, but this was fixable. |  The mixing palette, brushes, and cups of dilution/washing water. The colors used were Delta Ceramcoat craft paints: Trail Tan, Navy Blue, Evergreen and White, in various mixtures. |  The painted river has dried, and it is way too dark blue! Fortunately, it can be repainted. The river’s current scours the bottom along the stone retaining wall supporting the track, creating the deep water. On the other bank, the light tan earth beneath the cliff will be covered with talus and gravel. |  Here I am repainting the river bed with lighter shades of blue to simulate more shallow water. This was a gradual process, repainting and blending colors to lighten and to eliminate any abrupt color changes. It looked better when complete. |
 At the tunnel bridge, the river bed is too dark, and is being repainted, to lighten the colors of the deep pools. The talus and gravel is being added to each river bank. | 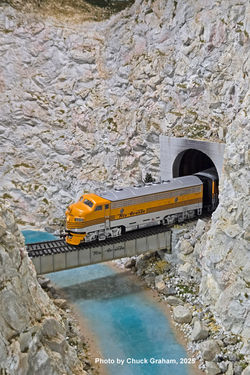 Here the tunnel bridge scene is nearly complete, needing only some more vegetation and a few trees. Note the lighter shades of blue, compared to other photos above. The final step was to pour several thin layers of Realistic Water from Woodland Scenics onto the painted river bed to give it a gloss finish. |  A standard gauge freight, led by F7s, winds through the canyon scene. Note the talus at the base of the canyon walls, and the lighter river colors compared to the earlier photos shown above. Fortunately in this hobby, many scenery “goofs” can be corrected later. |
Actually, I had intended a more gray-green-blue color for the river, as is the apparent color in several of my photos inside the Royal Gorge. I was not successful to simulate that gray-green appearance, but I still find the blue color pleasing. The color of a river depends on many factors – the observing angle, amount of sunlight, the reflected light from beyond, the amount of sediment in the water, etc. A river from an airplane appears to be black, yet from the river bank it does not. An exception is the Mississippi and the Missouri Rivers in the St Louis area – they appear muddy from all angles and under all conditions! So, we have some freedom in what colors we choose when modeling a body of water.